Frequently asked questions
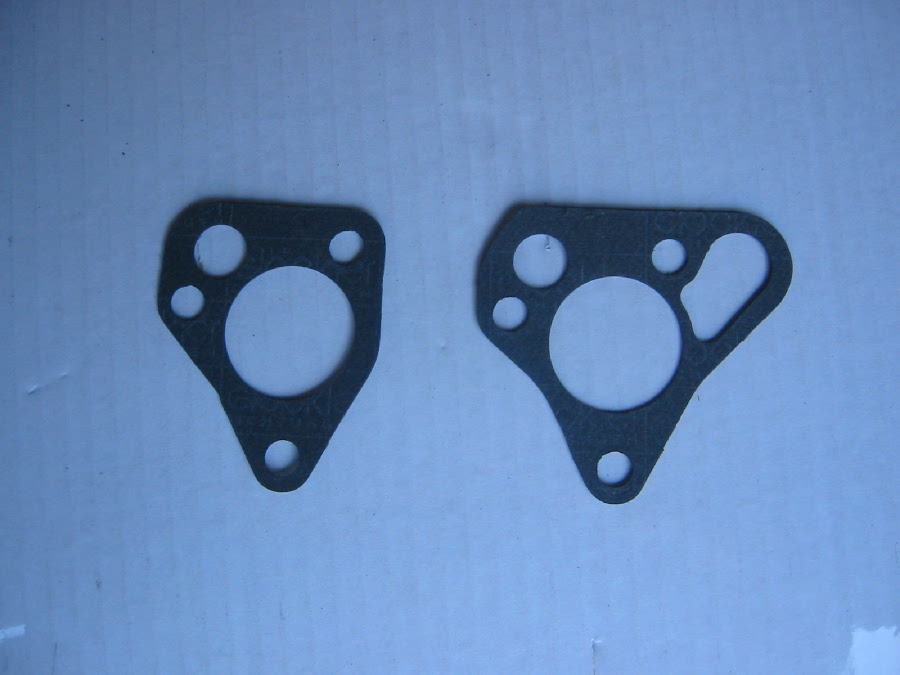
Which gasket do I use on my oil pump?
Use the left hand one pictured below for a G / GA 3 main bearing engine or the right hand one for a GB onwards 5 main bearing engine.
How do I fit the distributor drive?
The spindle will fit in a number of ways round - get the engine set up with the crank at TDC and number one cylinder firing (the rockers will both have clearance).
Screw a long bolt into the central hole and get the larger of the two sectors at the top with the slot about level before pushing it into the block.
As it enters and the teeth mesh with the camshaft the spindle will rotate anti clockwise until it ends up as in the picture below.
This will ensure that when the dizzy is fitted, number one lead will fit on the top right hand cap socket.
My OD doesn't work or works if you hold the gearlever towards you. How do I get at the overdrive inhibitor switch?
Put a jack under the removable gearbox crossmember and remove the 4 bolts holding it, lower the crossmember. Take off the radio console / armrest and the tunnel carpet, undo the screws holding the top cover of the tunnel round the gear lever (4 synchro) or the big tunnel cover (3 synchro). You will see the switch on the left hand side at the front of the gear lever turret. Pull off the 2 spade connectors and using a long stout screwdriver (4 synchro), tap the side of the switch to loosen it (anti clockwise) - it has a very coarse thread and will unscrew easily. Normally there will be 2 washers under the switch - test the switch for correct operation and if OK refit with just one washer. Refit the crossmember and test operation before refitting the tunnel cover.
What oil do you use in the gearbox?
Ordinary 20/50 or 10/40 engine oil, not gear oil or anything containing anti friction additives like STP - I prefer to use a different coloured oil in the gearbox to the engine, this helps identify where oil leaks are coming from, especially when dripping from the bellhousing area.
What's the difference between your serviced OD conversion kit and the reconditioned one?
In the serviced kit the OD is stripped, cleaned and fitted with new seals, O rings and gaskets whereas in the reconditioned kit the bearings, sliding clutch linings, pump, valves and solenoid are all replaced with new ones. Both kits contain a servicable secondhand OD gearbox mainshaft and a new or good secondhand wiring harness and inhibitor switch.
Do you supply OD kits in the UK?
No, the kits are specifically for the US / Canada to reduce shipping costs - in the UK and Europe I ship full OD gearboxes.
What's the difference between early and late LH OD speedo gears?
The early cars (67 to 75) had a blue drive gear and a white pinion (21 teeth on the pinion) this matched the 1280 tpm speedo.
The late cars (76 on) had a red drive gear and a red pinion (20 teeth on the pinion) this matched the 1000 tpm speedo.
Does the propshaft have to be changed when you change from non OD to OD gearbox?
Only on 3 synchro gearboxes fitted up to 1968 - the 4 synchro cars used the same propshaft on both OD and non OD gearboxes
How do I fix the clonk from the rear end?
First jack up one rear wheel and release the handbrake turn the wheel by hand and observe the propshaft drive flange, as you turn the wheel back and forth, you will feel the clonk as well as hear it. If the clonk happens before the flange moves the slack is in the axle, if it's after the flange moves, it's in the shaft. Note: with wire wheels it can also be in the wheel splines - apply the handbrake, release the spinner slightly and feel for the clonk.
Fixing the axle clonk for tube axles:
1. Jack up the rear of the car and
place on axle stands, remove the rear wheels.
2. Drain the axle oil.
3. With the handbrake on, remove the split pin from the RH axle nut and undo the
nut from the half shaft.
4. Release the handbrake and remove the split pin from the handbrake cable
cotter pin on the LH wheel and pull out the pin.
5. Undo the handbrake pivot or strap from the axle bracket and move the cable
out of the way ( later cars with the solid rod, release the RH pin as well
)
6. Undo all the cover screws and remove the cover.
7. Rotate the carrier until the roll pin is at the top and drive it out using a
suitable drift.
8. Rotate the carrier so the bottom of the cross pin faces you (ie so the roll
pin hole is away from you) and drive it forwards about 3/4 inch - not
more than an inch or it will get trapped by the case and pinion gear and
you won't be able to rotate it again!
9. Rotate the carrier so the top of the cross pin is facing you, insert a small
screwdriver or other tool into the roll pin hole in the cross shaft and pull and
twist it out.
10. Rotate the carrier and extract the two pinion gears and their old washers.
11. Remove the brake drum and pull the hub off the RH shaft and undo the four
bolts holding the backplate and bearing cap to the axle.
12. Gently pull the backplate forward over the half shaft end, taking
care not to damage the brake line ( it will flex enough to allow you to do this
- but if you feel more comfortable not bending the line, remove it from the
brake cylinder). Support the backplate horizontally using a bit of wire tied
round the axle tube.
13. Use a thin chisel to split the bearing cap from the axle tube and prise it
off, check the condition of the oil seal - this is a good time to replace it if
it has been weeping.
14. Run a nut down a long screw/bolt so it is about 2" from the head (you
need two of these) and place them into opposite holes on the axle case. Replace
the hub on the half shaft so that it rests on the two bolts. Replace the axle
nut and tighten - it will pull the bearing out of its housing - only pull it
out enough to just extract the drive gear.
15. Remove the RH drive gear from the diff carrier with its fibre washer (if it
still exists) and then the LH gear.
16. Inspect the gears for wear - a bright face on the teeth with a definite
ridge or step near the root of the teeth indicates a worn gear. New, they have a
slight roughness in terms of ridges running along the teeth and a serviceable
gear will have just the tops of these ridges rubbed bright.
17. Also check the splines of the drive gears on the half shafts - there should
be barely any slop - excessive wear means new gears and probably new half shafts
too!
18. Inspect the cross pin for wear and replace if necessary.
19. Fit the large fibre washers on the drive gears and insert into the carrier,
LH first, then RH.
20. Remove the axle nut and hub from the half shaft, remove the two bolts, refit
the bearing cap and the backplate and tighten the four bolts evenly to pull the
cap and bearing back into place. Refit the hub, axle nut and brake drum.
21. Replace the pinion gears on the drive gears by inserting one and turning the
half shaft to carry it round so that the second can be placed opposite the first
- it may take a bit of experimenting to get them lined up so that the cross pin
can be pushed in.
22. Once the pinions are correctly aligned, rotate the carrier so you can push
the cross pin in from the bottom, line up the roll pin hole with the
hole in the carrier, insert one copper washer and push the crosspin through
the carrier, into the washer and into the pinion gear. Push it though into the
second pinion but not all the way.
23. Rotate the carrier so the pin is vertical, slide in the other copper washer
and lever the pin upwards until the roll pin holes line up, drive in a NEW roll
pin.
24. Fit a new gasket and the rear cover, refit the handbrake cable and road
wheels.
25. Refill the axle with EP80/90 gear oil. (1.5 pints 0.84 litre)
25. Lower the car to the ground and tighten the RH axle nut to 150 ftlbs and
align to next split pin hole, refit split pin.
Fixing the shaft clonk involves removing the shaft from the car and replacing the universal joints.
Fixing the wire wheel clonk involves buying and fitting new hubs and / or wheels ( - $$$)
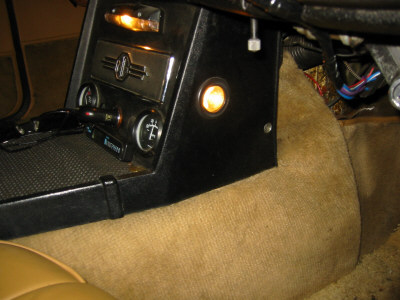
Interior lights
Extra light for the footwells can be achieved by fitting small "eyeball" lights in the sides of the centre console - these ones came from the overhead reading lights in a Ford Granada! They wire directly to the existing light and come on either manually or with the doors.
How do you fit the soft top (hood)?
Under the foam seal on the header
rail is an ally channel that is pop riveted into the header rail. Also two
plastic blocks at each end held on by screws.
You need to take all this off. It is worth undoing the six crosshead screws that
hold the header to the frame and shake out all the little bits of rivet left
inside after you have drilled them out. You will sometimes find a hole at one
end of the header rail that you can shake them out of - if not drill one about
1/4 inch diameter on the front corner.
Pull the rear rail out of the old top
and slide it into the pocket at the rear of the new one - slide it well past the
hole and pull it back under the material on the outside of the hole so that the
ends are tucked inside.
Fit the back end of the hood first and lock the header to the windscreen. Lay
the hood over the frame and put a electric fan heater in the car for a couple of
hours to really warm the hood up. Pull the sides of the hood forward until the
front end of the gutter is level with the end of the rail. Hold it there, unhook
the rail from the screen and fix the plastic block over the tabs to hold it in
place. Do each side and make sure that when you latch the rail the hood is even.
Use a little spray adhesive on the rail top and let it go tacky (only the rail -
not the material as well) and pull the material forward in the centre and tack
it down on the adhesive (you can stick and unstick it until you get it right.
The hood material should be taut but not stretched. If the rail jumps back when
you unlatch it - you have got it too tight.
Once the material is fixed to the header, unlatch the rail and fold the frame
half back. use more adhesive and stick the material to the lip and underside of
the rail. Then fit the ally channel with new rivets. Run a bead of silicone
sealant along the rail between the channel and the front lip - this will stop
water getting between the hood and the channel - a notorious leak point on Bs.
Get a new foam seal and work it into the channel by hooking the front edge in
the channel and pushing the rear edge into the channel with a blunt screwdriver
or putty knife. Trim the excess material behind the seal using a sharp craft
knife.
You now need to secure the rear frame
hoop in the flap of material sewn into the top just in front of the rear window.
This can be folded over the hoop and glued in place - it does tend to come
unglued after a while and I prefer to sew the flaps as well as glue - it takes a
while and is awkward but the end result is much better.
Finally fit the snap studs to the
front ears, the upper rear straps and the lower rear ears. You can buy a kit of
various anvils and tools that slip over the jaws of a Vise Grip / Mole Wrench to
make this job much easier.
How do you repair the heated rear screen?
There has been some discussion on how to fix
these - I thought I would share a tip I discovered while investigating one that
wasn't working at all.
My first thought was to check the power & earth connections on the screen -
these turned out to be fine but, while one probe was still hooked under the clip
on the left hand side I noticed that if I ran the other probe along the wires
painted on the screen I got a voltage reading.
So - to fix your broken wires you just need to run the probe along the wire
(with the power turned on!) assuming the fixed probe is on the left, a battery
voltage reading means the break in the wire is to the left of the current
position, no volts means the break is to the right of the current position. Just
work along slowly and put a dab of repair paint on the spot where the voltage
goes from 0 to 12 or vice versa.
Once a wire is repaired you will get half battery voltage in the middle of the
wire (and proportionate readings along the length).
This method certainly works on 1975 cars (with brown coloured wires) - I don't
know yet whether other years had different types of rear screens that used
different types of wire which don't give a voltage reading because they are
insulated in some way.